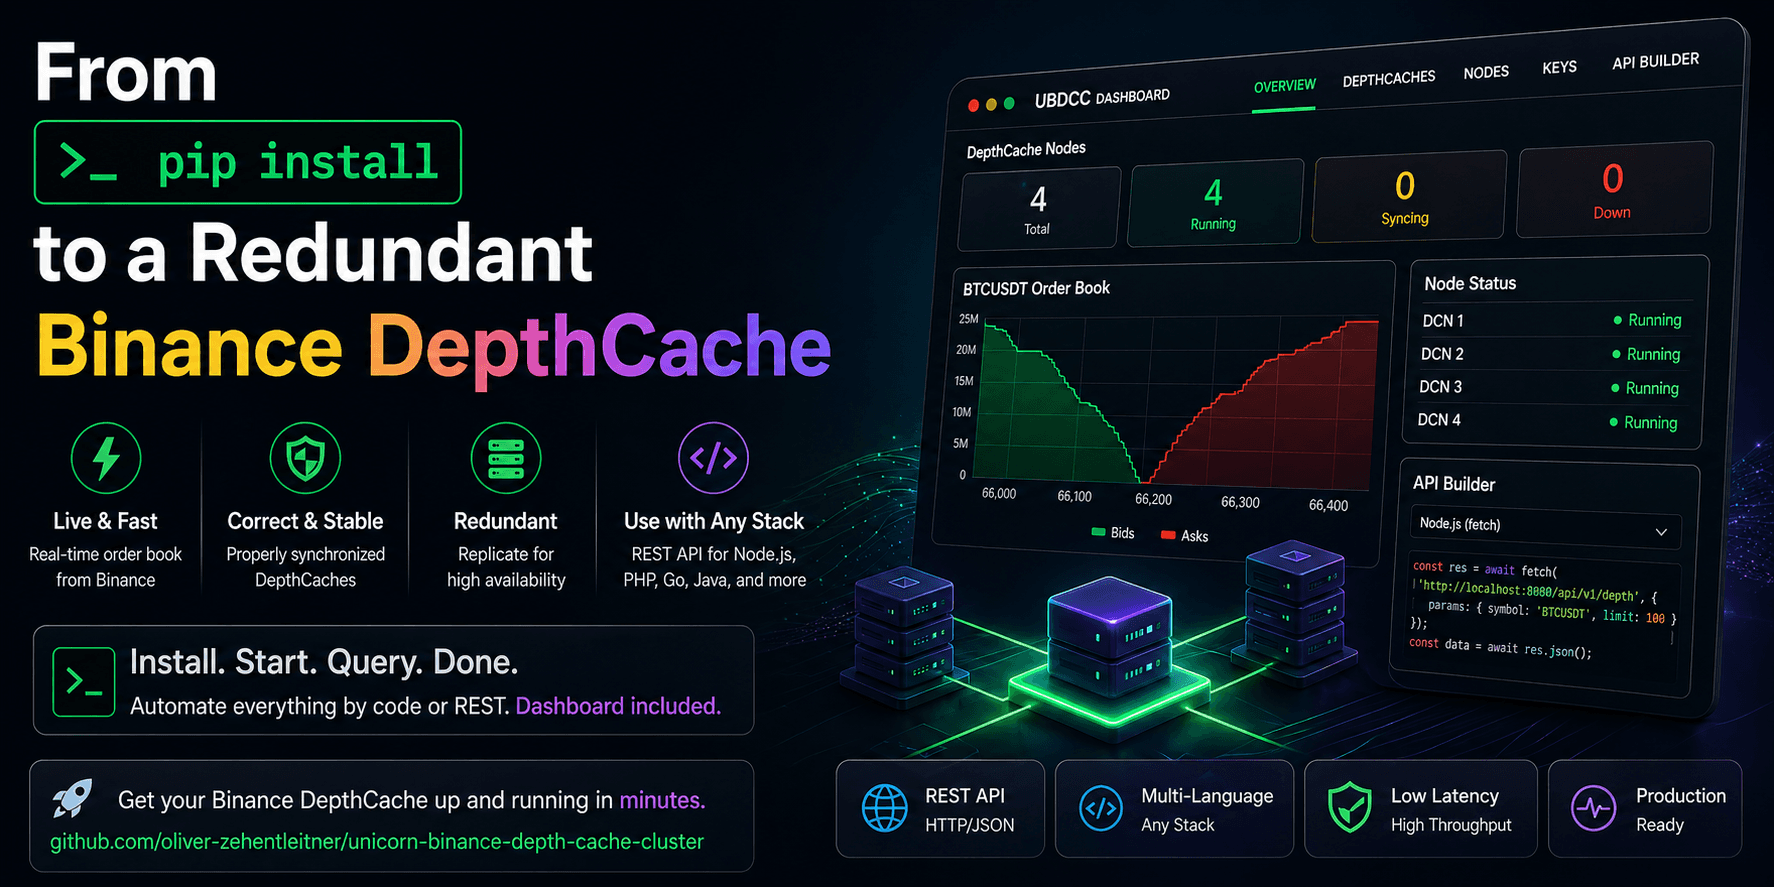
From `pip install` to a Redundant Binance Order Book Cluster — UBDCC + Dashboard Quickstart
A practical quickstart for correctly synchronized, replicated Binance DepthCaches with browser management and multi-language access.
This is the quickstart.
If you want the architectural “why” behind it — why UBDCC is not just a cache, why
#6000is a trust signal, and how UBWA → UBLDC → UBDCC turns Binance depth streams into an observable trust layer — read the companion deep-dive:UBDCC Deep-Dive: Building a Trust Layer for Binance Order Books
If your goal is simple — “I need a Binance DepthCache and I want it running now” — this is probably the shortest path I know.
With UBDCC, you can start live, correctly synchronized Binance DepthCaches in minutes, manage and automate the setup by code or REST, and use the browser dashboard as an additional operational interface with a built-in API Builder.
You do not need Kubernetes to start.
You do not need Redis.
You do not need PostgreSQL.
You do not need to build your own cache manager, failover logic, or API layer first.
The local quickstart is really just this:
pip install ubdcc
ubdcc start --dcn 4
ubdcc-dashboard start
And a few minutes later, you have live Binance DepthCaches running locally.
That is the point of this article.
Not theory.
Not architecture for architecture’s sake.
Just getting a real Binance DepthCache up and running quickly — and then understanding why the setup is stronger than it looks at first.
Not a Python developer?
That is fine.
UBDCC is implemented in Python, but once it is running, you use it like a local service over HTTP/JSON.
Your application can stay in Node.js, PHP, Go, Java, Rust, C#, or anything else that can make HTTP requests.
This is the hands-on quickstart. If you first want the technical background, read these two companion posts:
Your Binance Order Book Is Wrong — Here's Why — why naive local Binance order books can silently accumulate stale levels.
Why Your Binance Order Book Should Not Live Inside Your Bot — why shared market-data infrastructure is cleaner than per-bot cache ownership.
Video walkthrough
If you prefer to see the full setup once before going through the steps, here is the uncut quickstart video:
Who this is for
This is useful if you want a Binance DepthCache for things like:
trading bots
arbitrage systems
market making
dashboards
alerting
execution services
research tools
mixed-language setups where not everything is written in Python
If you only have one Python process and one local consumer, UBLDC may already be enough.
UBDCC is what you reach for when you want more than one in-process cache and do not want to build the rest of the infrastructure yourself.
What UBDCC is — and what it is not
UBDCC turns Binance DepthCaches into a running service.
Instead of every script opening its own WebSocket connection, downloading its own snapshot, and maintaining its own copy of the same market, you start UBDCC once and query the DepthCache over HTTP/JSON whenever you need it.
The cluster has three parts:
mgmt — the coordinator that keeps cluster state and distributes work
restapi — the HTTP interface your clients talk to
dcn — short for DepthCache Node, a worker process that actually holds and maintains DepthCaches in memory
A DCN is where the real DepthCache work happens.
It fetches snapshots, consumes Binance depth streams, keeps books synchronized, re-syncs when needed, and can hold replicas for failover.
If you remember only one thing:
A DCN is the part of the cluster where the actual DepthCaches live.
UBDCC is not a trading bot.
It does not place orders, route execution, generate signals, manage portfolios, or decide what to trade. It is the market-data layer underneath those things.
Why this is useful in practice
Once a DepthCache is synchronized inside UBDCC, your consumers are no longer pulling fresh Binance snapshots again and again.
They are reading from the cache that is already running in your local cluster.
That gives you some very practical advantages:
much lower latency than repeatedly going back to Binance REST
far less pressure on Binance rate limits
one running DepthCache can serve many consumers
strategy restarts do not mean rebuilding the whole market view from scratch
you can hit your local cluster as hard as you want without hammering Binance the same way
This is the same architectural shift I describe in more detail here: Why Your Binance Order Book Should Not Live Inside Your Bot
That is the practical value.
The “shared service” part is not the first thing the user wants.
The first thing the user wants is a Binance DepthCache that is up, correct, fast, and usable.
UBDCC just happens to solve the rest at the same time.
Step 1 — Install Python if needed
UBDCC is distributed as a Python package, so the machine that runs it needs Python 3.9 or newer.
That does not mean your own application has to be written in Python.
If you are a Node.js, PHP, Go, Java, Rust, or C# developer, think of Python here as a one-time runtime dependency: install it once, start UBDCC, and then use the running service over HTTP/JSON from your own stack.
Check whether Python is already available:
python3 --version
On Windows, if Python is missing, download and install it once from python.org.
Optional but recommended:
python3 -m venv ubdcc-env
source ubdcc-env/bin/activate
# Windows:
# ubdcc-env\Scripts\activate

Step 2 — Install UBDCC
python3 -m pip install ubdcc
That one package gives you the cluster components and the dashboard.
For the local quickstart, there is no long dependency story and no separate UI installation dance.
Install once and move on.

Step 3 — Start the cluster
ubdcc start --dcn 4
This gives you:
1 management process
1 REST API process
4 DCNs
That is already enough to get real Binance DepthCaches running locally with redundancy and failover potential.
After startup, note the REST endpoint, usually:
http://127.0.0.1:42081/
A setup that would normally take a fair amount of engineering work is available here as a package, a CLI, a REST API, and an optional browser dashboard.

Step 4 — Open the dashboard
In a second terminal:
ubdcc-dashboard start
By default, the dashboard binds to 127.0.0.1:8080 and opens in your browser.
Connect it to:
http://127.0.0.1:42081
The dashboard is optional, but it makes the first-run experience much easier and comes with a built-in API Builder for quick multi-language onboarding.
You can see nodes, markets, replicas, credentials, sync state, and generated API calls. That is why it matters so much: it turns a DepthCache cluster into something you can inspect and operate immediately.


Step 5 — Add credentials if needed
For pure Spot mainnet markets, you do not need credentials.
Credentials become relevant for some other Binance environments, some snapshot flows, and for getting more headroom where authenticated rate limits apply.
You can handle that through the dashboard or directly through code / REST.
In the dashboard:
click Credentials
choose the account group
add an API key / secret pair
The cluster can then distribute credential assignments across nodes.

Step 6 — Create DepthCaches with replicas
Now create your first markets.
You can do this through the dashboard, through code, or directly through REST.
In the dashboard:
click DepthCaches
choose an exchange such as
binance.comadd symbols like
BTCUSDT,ETHUSDT,BNBUSDTset Replicas to
2or3create them
This is the moment where the setup usually gets its first “okay, that is actually cool” reaction.
You are not creating one local cache in one process.
You are creating running Binance DepthCaches that are:
synchronized
visible
replicated if you want
ready to query over REST
Watch the tiles after creation.
They should move into a synchronized state. That is one of the strongest parts of the dashboard: it does not just show that a cache exists, it shows whether it is actually ready to trust.


The replicas are intentionally started with a slight delay. After a few minutes, they should all be in sync:


Step 7 — Kill a node and watch failover happen
Now for the part that makes the architecture feel real.
Create at least one market with replica count 3.
Then:
open the DCNs tab in the dashboard
find a DCN that hosts that market
copy the DCN name
go back to the operator console
remove that DCN by name
Example:
ubdcc> remove-dcn <dcn-name>
What should happen:
the node disappears
replica count temporarily drops
the scheduler redistributes work
a new replica comes up
the market remains available through another replica
That is the difference between “I have a cache” and “I have a cache that survives node loss”.


Step 8 — Query the DepthCache over REST
Before touching application code, test from the shell.
curl 'http://127.0.0.1:42081/get_asks?exchange=binance.com&market=BTCUSDT&limit_count=5'
Or with HTTPie:
http GET 'http://127.0.0.1:42081/get_asks?exchange=binance.com&market=BTCUSDT&limit_count=5'

This is where the practical benefit becomes obvious.
You can hammer the local cluster with reads as much as you want.
Your consumers are no longer going back to Binance for fresh snapshots over and over again. They are reading from the synchronized DepthCache that UBDCC is already maintaining.
That is faster, easier on rate limits, and especially useful once several bots, dashboards, and services all need the same market view at the same time.
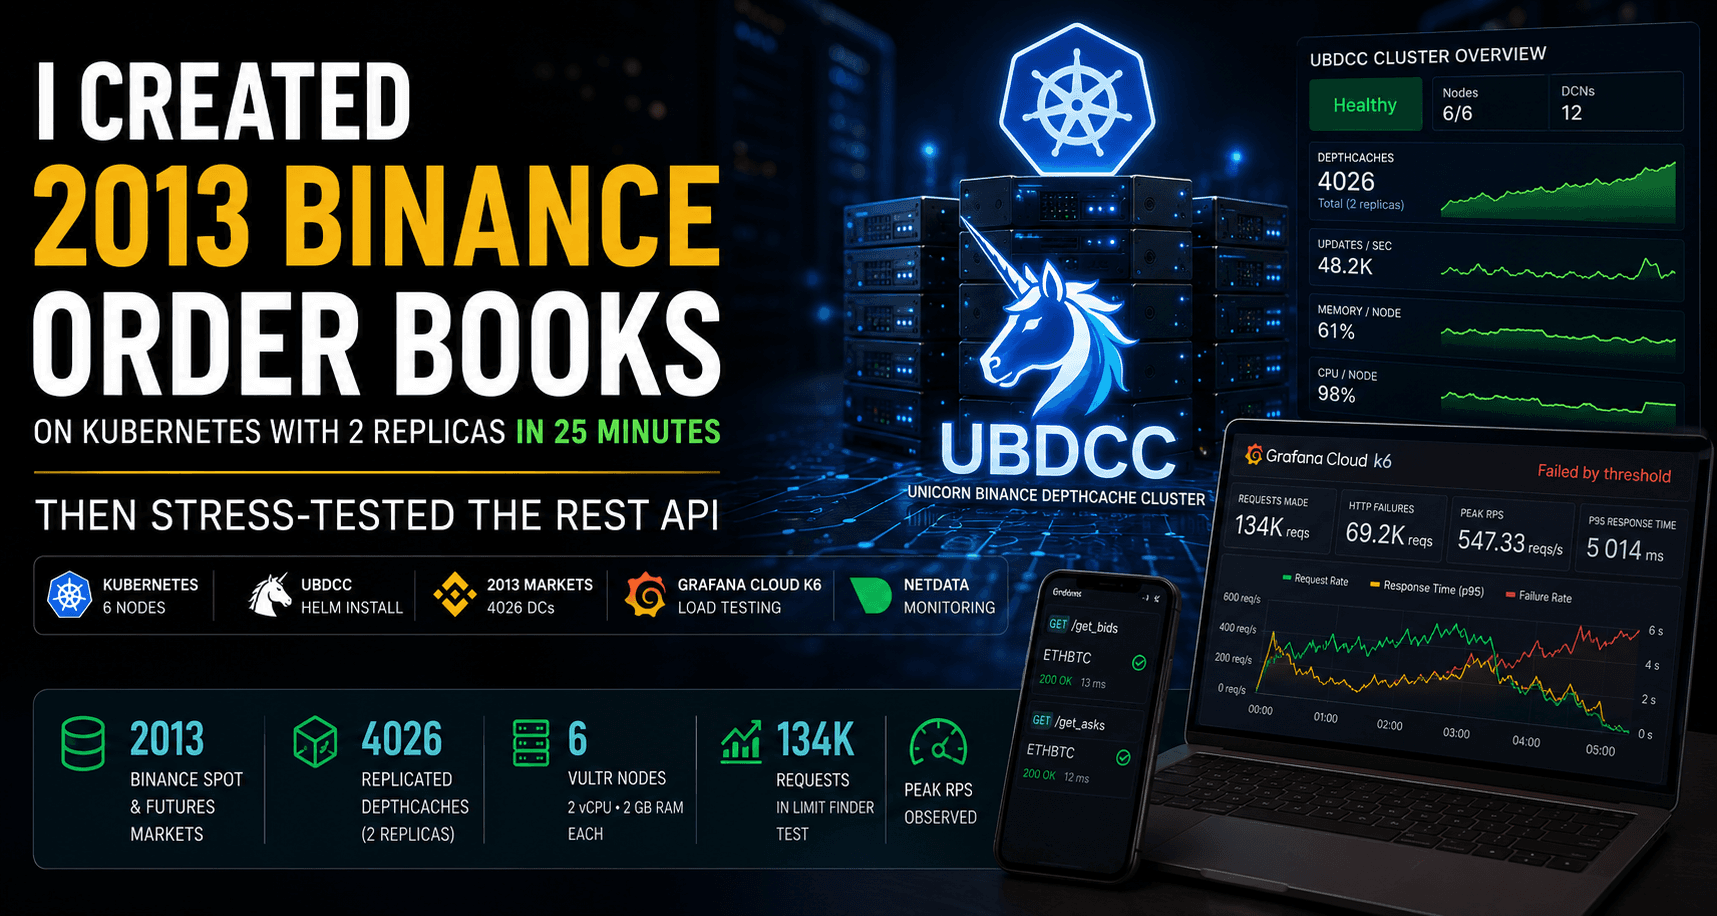
If you want to see how this idea behaves once moved from a local quickstart to Kubernetes, I later ran a larger stress test: I Created 2013 Binance Order Books on Kubernetes with 2 Replicas in 25 Minutes — Then Stress-Tested the REST API
In that follow-up, I created 2013 Binance Spot and Futures markets with 2 replicas each — 4026 replicated DepthCaches in total — on six low-cost Vultr Kubernetes nodes and then tested the REST API with Grafana Cloud k6.
Step 9 — Generate client code for your language
Now open the API Builder in the dashboard.
This is one of the strongest parts of the whole setup.
The dashboard can generate snippets for:
curl
HTTPie
Python
JavaScript
Go
C#
Java
Rust
PHP
C/C++
So if your stack is mixed, the onboarding flow becomes very simple:
create the DepthCaches once
query them from any language
copy the snippet
paste it into your project
That is exactly how a system like this becomes useful outside one developer’s Python process.


Simple Python example
Python users can go two ways.
Raw HTTP
import requests

response = requests.get(
    "http://127.0.0.1:42081/get_asks",
    params={
        "exchange": "binance.com",
        "market": "BTCUSDT",
        "limit_count": 5
    },
    timeout=10
)

print(response.json())
Official cluster client
If you already live in the UNICORN Binance world, you can also use the official cluster-aware client path instead of raw HTTP.
That gives Python users a smooth migration path from local caches to shared cluster-backed access.

Related projects
If you want to go deeper into the stack:
UBLDC — standalone local DepthCaches for single-process Python use and the UBDCC python client
UBWA — Binance WebSocket layer underneath the stack
UBTSL — trailing stop-loss engine from the same suite
UNICORN Binance Suite — the umbrella project
Final thoughts
The nice thing about UBDCC is that it starts simple.
You come for a working Binance DepthCache.
What you also get is:
correct synchronization
explicit cache state
replicas
failover
browser management
multi-language access
fast local startup
room to scale later
That is a lot to get from a pip install.
Related background:
I Created 2013 Binance Order Books on Kubernetes with 2 Replicas in 25 Minutes — Then Stress-Tested the REST API — how the same idea behaves at Kubernetes scale with 4026 replicated DepthCaches and Grafana Cloud k6 load tests.
If you want to try it:
UBDCC: https://github.com/oliver-zehentleitner/unicorn-binance-depth-cache-cluster
UBDCC Dashboard: https://github.com/oliver-zehentleitner/ubdcc-dashboard
Telegram: https://t.me/unicorndevs
If something in this guide is unclear, missing, or does not work in your setup, please post it in the comments.
I am happy about constructive feedback, real-world test results, error reports, edge cases, and improvement ideas. If something is useful for others too, I will try to pick it up and improve the article accordingly.
I hope you found this informative and useful.
Follow me on Binance Square, GitHub, X, and LinkedIn, or join Telegram for updates on my latest publications. Constructive feedback is always appreciated.
Thank you for reading, and happy coding! ¯\_(ツ)_/¯